第6章 详情优化.md 46 KB
谷粒随享
第6章 详情优化
学习目标:
- 微服务分布式链路追踪组件应用(微服务基础组件)
- 针对于相对高并发业务场景进行性能优化
- 采用分布式缓存Redis
- 缓存击穿(分布式锁)
- 缓存穿透(分布式布隆过滤器)
- 缓存雪崩(分布式集群)
- 缓存一致性(基于MySQL-BinLog数据最终一致)
- 采用异步任务+线程池
- 代码优化:利用AOP将冗余代码抽取-提供自定义缓存注解
1、链路追踪Zipkin
一个看起来很简单的应用,背后可能需要数十或数百个服务来支撑,一个请求就要多次服务调用。当请求变慢、或者不能使用时,我们是不知道是哪个后台服务引起的。这时,我们使用 Zipkin 就能解决这个问题。由于业务访问量的增大,业务复杂度增加,以及微服务架构和容器技术的兴起,要对系统进行各种拆分。微服务系统拆分后,我们可以使用 Zipkin 链路,来快速定位追踪有故障的服务点。
Zipkin/SkyWalking 是一款开源的分布式实时数据追踪系统(Distributed Tracking System),能够收集服务间调用的时序数据,提供调用链路的追踪。
Zipkin 其主要功能是聚集来自各个异构系统的实时监控数据,在微服务架构下,十分方便地用于服务响应延迟等问题的定位。
Zipkin 每一个调用链路通过一个 trace id 来串联起来,只要你有一个 trace id ,就能够直接定位到这次调用链路,并且可以根据服务名、标签、响应时间等进行查询,过滤那些耗时比较长的链路节点。
Zipkin 分布式跟踪系统就能非常好地解决该问题,主要解决以下3点问题:
- 动态展示服务的链路;
- 分析服务链路的瓶颈并对其进行调优;
- 快速进行服务链路的故障发现;
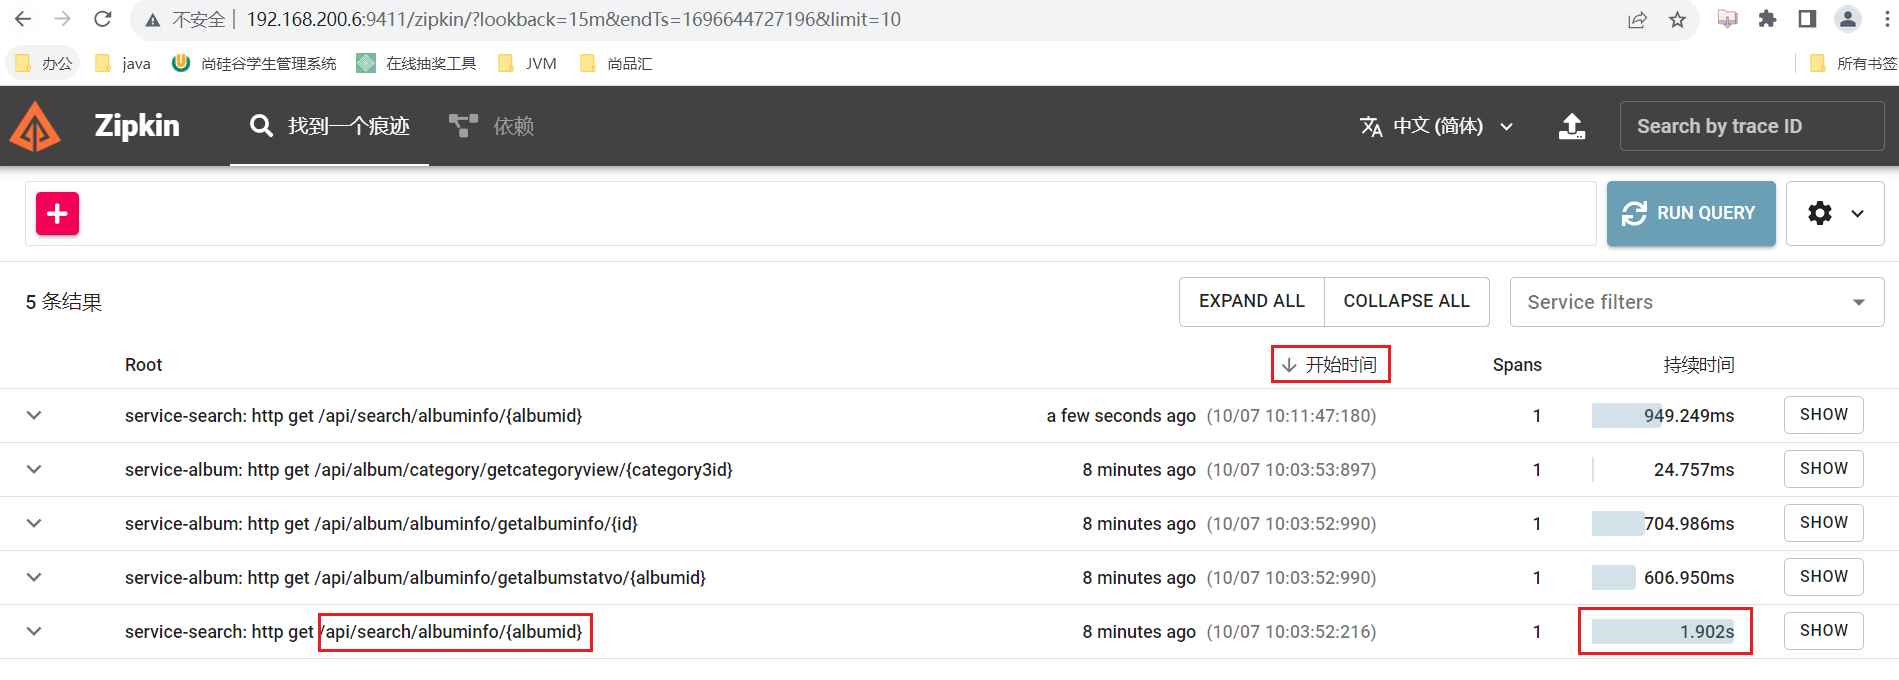
在优化前通过Zipkin链路追踪进行查看接口耗时
在
service-util工具模块pom.xml中新增Zipkin相关依赖<dependency> <groupId>io.micrometer</groupId> <artifactId>micrometer-tracing-bridge-brave</artifactId> </dependency> <dependency> <groupId>io.zipkin.reporter2</groupId> <artifactId>zipkin-reporter-brave</artifactId> </dependency> <dependency> <groupId>io.micrometer</groupId> <artifactId>micrometer-observation</artifactId> </dependency> <dependency> <groupId>org.springframework.boot</groupId> <artifactId>spring-boot-starter-actuator</artifactId> </dependency> <dependency> <groupId>org.springframework.cloud</groupId> <artifactId>spring-cloud-starter-zipkin</artifactId> <version>2.2.8.RELEASE</version> </dependency> <dependency> <groupId>io.github.openfeign</groupId> <artifactId>feign-micrometer</artifactId> <version>12.5</version> </dependency>在Nacos配置
common.yaml中新增配置(已完成)management: zipkin: tracing: endpoint: http://192.168.200.6:9411/api/v2/spans tracing: sampling: probability: 1.0 # 记录速率100%解决异步任务+多线程导致异步Feign请求无法被链路追踪,故需要未线程池设置装饰器(将当前线程内上下文中trace_id传递到子线程中),故将当日资料中复制到
service-util且设置Spring线程池对象装饰器
 //设置解决zipkin链路追踪不完整装饰器对象
 taskExecutor.setTaskDecorator(new ZipkinTaskDecorator(zipkinHelper));
访问专辑详情接口、或查看专辑页面进行测试
- 通过Zipkin管理页面查看接口耗时
2、详情优化
虽然咱们实现了页面需要的功能,但是考虑到该页面是被用户高频访问的,所以性能需要优化。一般一个系统最大的性能瓶颈,就是数据库的io操作。从数据库入手也是调优性价比最高的切入点。
一般分为两个层面:
- 一是提高数据库sql本身的性能
- 单表
- 全值匹配我最爱、最左前缀要遵守/带头大哥不能死、中间兄弟不能断
- 索引列上少计算、LIKE符号写最右、
- 多表
- 小表(驱动表,在查询条件列上建立索引)驱动大表(被驱动表,关联字段,查询条件,上建立索引)
- 减少子查询,优先使用关联查询
- 关联字段类型一致 、表编码一致
- 二是尽量避免直接查询数据库。
重点要讲的是第二个层面:尽量避免直接查询数据库。
解决办法就是:分布式缓存
2.1 缓存常见问题
缓存最常见的4个问题:
- 缓存穿透
- 缓存雪崩
- 缓存击穿
- 缓存一致性
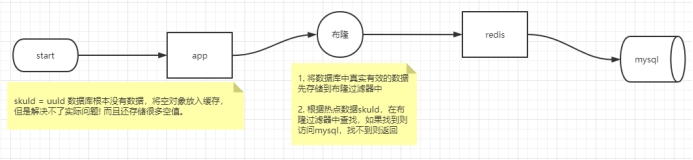
缓存穿透: 是指查询一个不存在的数据,由于缓存无法命中,将去查询数据库,但是数据库也无此记录,并且出于容错考虑,我们没有将这次查询的null写入缓存,这将导致这个不存在的数据每次请求都要到存储层去查询,失去了缓存的意义。在流量大时,可能DB就挂掉了,要是有人利用不存在的key频繁攻击我们的应用,这就是漏洞。
- 解决1 :空结果也进行缓存,但它的过期时间会很短,最长不超过五分钟,但是不能防止随机穿透。
- 解决2 :使用布隆过滤器来解决随机穿透问题。
缓存雪崩:是指在我们设置缓存时采用了相同的过期时间,导致缓存在某一时刻同时失效,请求全部转发到DB,DB瞬时压力过重雪崩。
- 解决1:原有的失效时间基础上增加一个随机值,比如1-5分钟随机,这样每一个缓存的过期时间的重复率就会降低,就很难引发集体失效的事件。
- 解决2:如果单节点宕机,可以采用集群部署方式防止雪崩
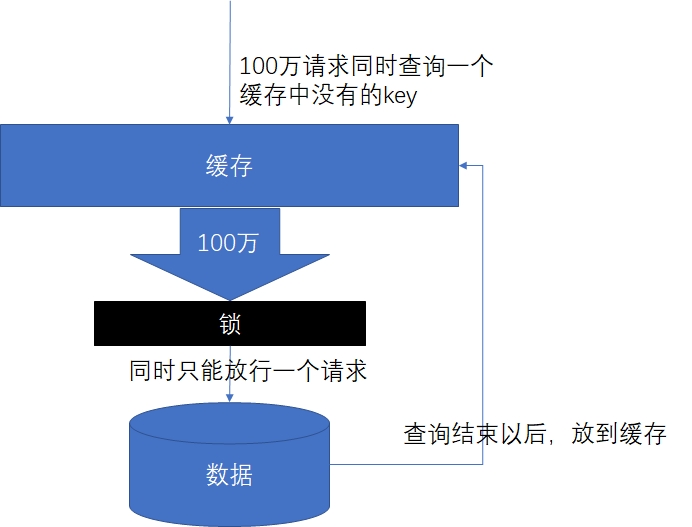
缓存击穿: 是指对于一些设置了过期时间的key,如果这些key可能会在某些时间点被超高并发地访问,是一种非常“热点”的数据。这个时候,需要考虑一个问题:如果这个key在大量请求同时进来之前正好失效,那么所有对这个key的数据查询都落到db,我们称为缓存击穿。
与缓存雪崩的区别:
- 击穿是一个热点key失效
- 雪崩是很多key集体失效
- 解决:锁
2.2 缓存击穿解决方案
2.2.1 分布式锁
随着业务发展的需要,原单体单机部署的系统被演化成分布式集群系统后,由于分布式系统多线程、多进程并且分布在不同机器上,这将使原单机部署情况下的并发控制锁策略失效,单纯的Java API并不能提供分布式锁的能力。为了解决这个问题就需要一种跨JVM的互斥机制来控制共享资源的访问,这就是分布式锁要解决的问题!
分布式锁主流的实现方案:
- 基于数据库实现分布式锁
- 基于缓存( Redis等)
- 基于Zookeeper
每一种分布式锁解决方案都有各自的优缺点:
- 性能:Redis最高
- 可靠性:Zookeeper最高(CAP定理-CP)
2.2.2 使用 Redisson 解决分布式锁
Redisson是一个在Redis的基础上实现的Java驻内存数据网格(In-Memory Data Grid)。它不仅提供了一系列的分布式的Java常用对象,还提供了许多分布式服务。其中包括(BitSet, Set, Multimap, SortedSet, Map, List, Queue, BlockingQueue, Deque, BlockingDeque, Semaphore, Lock, AtomicLong, CountDownLatch, Publish / Subscribe, Bloom filter, Remote service, Spring cache, Executor service, Live Object service, Scheduler service) Redisson提供了使用Redis的最简单和最便捷的方法。Redisson的宗旨是促进使用者对Redis的关注分离(Separation of Concern),从而让使用者能够将精力更集中地放在处理业务逻辑上。
官方文档地址:https://github.com/Redisson/Redisson/wiki
实现步骤:
在
service-util模块中解开redisson相关依赖(注释放开)<dependency> <groupId>org.redisson</groupId> <artifactId>redisson-spring-boot-starter</artifactId> </dependency>在
service-util模块中添加配置类package com.atguigu.tingshu.common.config.redis; import lombok.Data; import org.apache.commons.lang3.StringUtils; import org.redisson.Redisson; import org.redisson.api.RedissonClient; import org.redisson.config.Config; import org.redisson.config.SingleServerConfig; import org.springframework.boot.context.properties.ConfigurationProperties; import org.springframework.context.annotation.Bean; import org.springframework.context.annotation.Configuration; /** * redisson配置信息 */ @Data @Configuration @ConfigurationProperties("spring.data.redis") public class RedissonConfig { private String host; private String password; private String port; private int timeout = 3000; private static String ADDRESS_PREFIX = "redis://"; /** * 自动装配 */ @Bean RedissonClient redissonSingle() { Config config = new Config(); if (StringUtils.isBlank(host)) { throw new RuntimeException("host is empty"); } SingleServerConfig serverConfig = config.useSingleServer() .setAddress(ADDRESS_PREFIX + this.host + ":" + port) .setTimeout(this.timeout); if (StringUtils.isNotBlank(this.password)) { serverConfig.setPassword(this.password); } return Redisson.create(config); } }优化代码
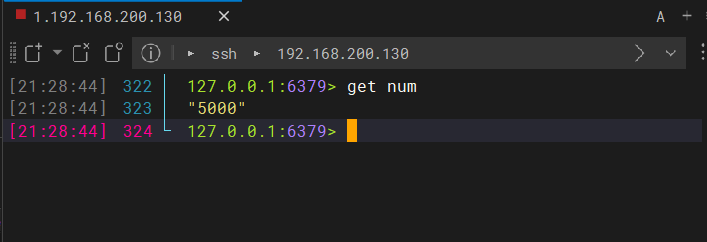
package com.atguigu.tingshu.album.service.impl;

import com.alibaba.cloud.commons.lang.StringUtils;
import com.atguigu.tingshu.album.service.TestService;
import org.redisson.api.RLock;
import org.redisson.api.RedissonClient;
import org.springframework.beans.factory.annotation.Autowired;
import org.springframework.data.redis.core.StringRedisTemplate;
import org.springframework.stereotype.Service;

/**
* @author atguigu
* @ClassName TestServiceImpl
* @description: TODO
* @date 2023年08月22日
* @version: 1.0
*/
@Service
public class TestServiceImpl implements TestService {

@Autowired
private StringRedisTemplate stringRedisTemplate;

@Autowired
private RedissonClient redissonClient;

@Override
public void testLock() {
    try {
        //先尝试获取分布式锁 1.创建锁对象  2.调用获取锁方法
        RLock lock = redissonClient.getLock("lock");

        //获取锁成功后,才执行业务
        lock.lock();  //阻塞到获取锁成功为止
        //lock.tryLock(5, TimeUnit.SECONDS);  //参数1:等待锁获取最大时间  参数2:时间单位  获取锁失败返回false
        //lock.tryLock(3, 5, TimeUnit.SECONDS);//参数1:等待锁获取最大时间  参数2:锁过期时间,参数3:时间单位  获取锁失败返回false

        try {
            //1.从Redis缓存中获取key="num"的值  保证redis中存在"num"(手动提前在redis中创建key)
            String value = redisTemplate.opsForValue().get("num");
            if (StringUtils.isBlank(value)) {
                return;
            }
            //2.对获取到值进行+1操作
            int num = Integer.parseInt(value);
            redisTemplate.opsForValue().set("num", String.valueOf(++num));
        } finally {
            //业务执行完毕释放锁
            lock.unlock();
        }
    } catch (Exception e) {
        e.printStackTrace();
    }
}
}
分布式锁:
ab -n 5000 -c 100 http://192.168.200.1:8500/api/album/test/testLock
2.3 分布式锁整合业务
@Autowired
private RedisTemplate redisTemplate;

@Autowired
private RedissonClient redissonClient;

/**
 * 根据专辑ID查询专辑信息(包括专辑标签列表)
 * 通过Redisson分布式锁解决缓存击穿问题
 *
 * @param id 专辑ID
 * @return 专辑信息
 */
@Override
public AlbumInfo getAlbumInfo(Long id) {
    try {
        //1.优先从缓存Redis中获取业务数据
        //1.1 构建专辑业务数据Key 形式:前缀+专辑ID
        String dataKey = RedisConstant.ALBUM_INFO_PREFIX + id;
        //1.2 查询缓存中专辑信息
        AlbumInfo albumInfo = (AlbumInfo) redisTemplate.opsForValue().get(dataKey);
        if (albumInfo != null) {
            //2.如果命中缓存,直接返回业务数据即可(不需要查库)
            return albumInfo;
        }

        //3.如果未命中缓存,先获取分布式锁
        //3.1 构建当前业务数据锁的Key 形式:业务key+锁的后缀
        String lockKey = dataKey + RedisConstant.CACHE_LOCK_SUFFIX;
        //3.2 构建当前业务数据锁的对象
        RLock lock = redissonClient.getLock(lockKey);
        //3.3 尝试获取分布式锁 tryLock默认锁过期时间30s底层还有看门狗机制进行锁自动续期
        boolean flag = lock.tryLock();
        if (flag) {
            try {
                //4.获取分布锁锁成功,执行查询数据库,并设置缓存
                AlbumInfo albumInfoFromDB = this.getAlbumInfoFromDB(id);
                int ttl = RandomUtil.randomInt(100, 600);
                redisTemplate.opsForValue().set(dataKey, albumInfoFromDB, RedisConstant.ALBUM_TIMEOUT + ttl, TimeUnit.SECONDS);
                return albumInfoFromDB;
            } catch (Exception e) {
                throw new RuntimeException(e);
            } finally {
                //5.释放分布式锁
                lock.unlock();
            }
        } else {
            //6.获取分布式锁失败,进行自旋(自旋可能获取锁成功线程会将业务数据已经放入缓存)
            return this.getAlbumInfo(id);
        }
    } catch (Exception e) {
        log.error("[专辑服务]获取专辑信息锁服务异常异常:{},执行兜底处理方案:{}", e, "直接查询数据库");
        return this.getAlbumInfoFromDB(id);
    }
}

/**
 * 抽取单独查询专辑数据业务方法
 *
 * @param id
 * @return
 */
@Override
public AlbumInfo getAlbumInfoFromDB(Long id) {
    //1.根据专辑ID查询专辑信息
    AlbumInfo albumInfo = albumInfoMapper.selectById(id);

    //TODO 业务校验,校验专辑状态是否为下架状态,只有下架状态专辑才可以被修改

    //2.根据专辑ID查询专辑标签列表
    LambdaQueryWrapper<AlbumAttributeValue> queryWrapper = new LambdaQueryWrapper<>();
    queryWrapper.eq(AlbumAttributeValue::getAlbumId, id);
    List<AlbumAttributeValue> albumAttributeValues = albumAttributeValueMapper.selectList(queryWrapper);
    if (CollectionUtil.isNotEmpty(albumAttributeValues)) {
        albumInfo.setAlbumAttributeValueVoList(albumAttributeValues);
    }
    return albumInfo;
}
2.4 AOP与分布式锁整合
专辑详情中多项数据接口需要查询缓存,那么分布式锁的业务逻辑代码就会出现大量的重复。因此,我们可以参考Spring框架事务注解来实现简化代码。只要类上添加了一个注解,那么这个注解就会自带分布式锁的功能。
实现如下:
- 在
service-util模块中添加一个注解 - 提供切面类,采用环绕通知对自定义注解进行增强
2.4.1 自定义注解
package com.atguigu.tingshu.common.cache;

import com.atguigu.tingshu.common.constant.RedisConstant;

import java.lang.annotation.*;
import java.util.concurrent.TimeUnit;

@Target({ElementType.METHOD})
@Retention(RetentionPolicy.RUNTIME)
@Inherited
@Documented
public @interface GuiGuCache {

    /**
     * 存入Redis业务数据以及锁的前缀
     * @return
     */
    String prefix() default "";

    /**
     * 存入Redis缓存业务数据过期时间
     * @return
     */
    long ttl() default RedisConstant.ALBUM_TIMEOUT;

    /**
     * 时间单位
     * @return
     */
    TimeUnit unit() default TimeUnit.SECONDS;
}
2.4.2 自定义切面类
package com.atguigu.tingshu.common.cache;

import cn.hutool.core.util.RandomUtil;
import com.atguigu.tingshu.common.constant.RedisConstant;
import lombok.extern.slf4j.Slf4j;
import org.aspectj.lang.ProceedingJoinPoint;
import org.aspectj.lang.annotation.Around;
import org.aspectj.lang.annotation.Aspect;
import org.redisson.api.RLock;
import org.redisson.api.RedissonClient;
import org.springframework.beans.factory.annotation.Autowired;
import org.springframework.data.redis.core.RedisTemplate;
import org.springframework.stereotype.Component;

import java.util.Arrays;
import java.util.concurrent.TimeUnit;
import java.util.stream.Collectors;

/**
 * @author: atguigu
 * @create: 2025-06-10 11:41
 */
@Slf4j
@Aspect
@Component
public class GuiGuCacheAspect {
    @Autowired
    private RedisTemplate redisTemplate;

    @Autowired
    private RedissonClient redissonClient;


    /**
     * 对所有方法上使用自定义缓存注解方法进行增强
     *
     * @param joinPoint
     * @param guiGuCache
     * @return
     * @throws Throwable
     */
    @Around("@annotation(guiGuCache)")
    public Object around(ProceedingJoinPoint joinPoint, GuiGuCache guiGuCache) throws Throwable {
        try {
            //1.优先从缓存中获取业务数据
            //1.1 将方法参数采用"_"进行拼接作为Key的一部分
            String params = "none";
            Object[] args = joinPoint.getArgs();
            if (args != null && args.length > 0) {
                params = Arrays.stream(args)
                        .map(Object::toString)
                        .collect(Collectors.joining("_"));
            }
            //1.2 构建缓存业务数据Key
            String dataKey = guiGuCache.prefix() + params;
            //1.3 查询Redis中缓存数据
            Object result = redisTemplate.opsForValue().get(dataKey);
            if (result != null) {
                return result;
            }

            //2.获取分布式锁:基于Redisson框架提供分布式锁
            //2.1 构建锁Key 形式=业务Key+锁后缀
            String lockKey = dataKey + RedisConstant.CACHE_LOCK_SUFFIX;
            //2.2 基于RedissonClient对象创建锁对象
            RLock lock = redissonClient.getLock(lockKey);

            //2.3 尝试获取分布式锁
            boolean flag = lock.tryLock(1, TimeUnit.SECONDS);

            //3.获取锁成功,执行查库业务方法(目标方法)
            if (flag) {
                try {
                    //3.1 执行目标查询数据库方法
                    result = joinPoint.proceed();
                    //3.2 将查询结果放入Redis中
                    long ttl = guiGuCache.ttl() + RandomUtil.randomInt(1200);
                    redisTemplate.opsForValue().set(dataKey, result, ttl, guiGuCache.unit());
                    return result;
                } finally {
                    //3.3 释放锁
                    lock.unlock();
                }
            } else {
                //4.获取锁失败,自旋,可能就会命中缓存
                Thread.sleep(500);
                return this.around(joinPoint, guiGuCache);
            }
        } catch (Throwable e) {
            //5.兜底处理:如果Redis服务不可用,则执行目标方法
            log.error("Redis服务异常:{}", e.getMessage());
            return joinPoint.proceed();
        }
    }
}
2.4.3 测试分布式锁
在这个实现类AlbumInfoServiceImpl中添加注解:
/***
 * 根据专辑ID查询专辑信息包含专辑标签列表
 * @param id 专辑ID
 * @return
 */
@Operation(summary = "根据专辑ID查询专辑信息包含专辑标签列表")
@GetMapping("/albumInfo/getAlbumInfo/{id}")
public Result<AlbumInfo> getAlbumInfo(@PathVariable Long id) {
    //AlbumInfo albumInfo = albumInfoService.getAlbumInfo(id);
    AlbumInfo albumInfo = albumInfoService.getAlbumInfoFromDB(id);
    return Result.ok(albumInfo);
}

/***
 * 根据专辑ID查询专辑信息包含专辑标签列表
 * @param id 专辑ID
 * @return
 */
@Override
@GuiGuCache(prefix = RedisConstant.ALBUM_INFO_PREFIX)
public AlbumInfo getAlbumInfoFromDB(Long id) {...}


/**
 * 根据专辑ID查询专辑统计信息
 *
 * @param albumId 专辑ID
 * @return
 */
@Override
@GuiGuCache(prefix = RedisConstant.ALBUM_INFO_PREFIX+":stat:")
public AlbumStatVo getAlbumStatVo(Long albumId){...}
在BaseCategoryServiceImpl实现类中添加注解:
/**
 * 根据一级分类Id获取分类标签以及标签值
 *
 * @param category1Id
 * @return
 */
@Override
@GuiGuCache(prefix="category:baseAttribute:") //将该方法执行查库结果放入缓存,采用分布式锁杜绝缓存击穿
public List<BaseAttribute> getAttributeByCategory1Id(Long category1Id){}

@Override
@GuiGuCache(prefix = "category:categoryview:")
public BaseCategoryView getCategoryView(Long category3Id){}

/**
 * 根据1级分类ID查询该分类下前7个置顶3级分类列表
 *
 * @param category1Id
 * @return
 */
@Override
@GuiGuCache(prefix = "category:topcategory3:")
public List<BaseCategory3> getTopBaseCategory3(Long category1Id){}

/**
 * 根据1级分类ID查询包含二级分类以及三级分类
 *
 * @param category1Id
 * @return
 */
@Override
@GuiGuCache(prefix = "category:categoryby1Id:")
public JSONObject getBaseCategoryListByCategory1Id(Long category1Id){}
在UserInfoServiceImpl实现类中添加注解:
@Override
@GuiGuCache(prefix = "user:")
public UserInfoVo getUserInfo(Long userId) {}
3、布隆过滤器
3.1 什么是布隆过滤器
布隆过滤器(Bloom Filter),是1970年,由一个叫布隆的小伙子提出的,距今已经五十年了。它实际上是一个很长的二进制向量和一系列随机映射函数。布隆过滤器可以用于检索一个元素是否在一个集合中。它的优点是空间效率和查询时间都比一般的算法要好的多,缺点是有一定的误识别率和删除困难。二进制大家应该都清楚,存储的数据不是0就是1,默认是0。
主要用于判断一个元素是否在一个集合中,0代表不存在某个数据,1代表存在某个数据。
总结: 判断一个元素一定不存在 或者 可能存在! 存在一定的误判率{通过代码调节}
Bit 数组:
| 0 | 0 | 0 | 0 | 0 | 0 | 0 | 0 | 0 |
|---|---|---|---|---|---|---|---|---|
3.1.1 使用场景
大数据量的时候, 判断一个元素是否在一个集合中。解决缓存穿透问题
3.1.2 原理
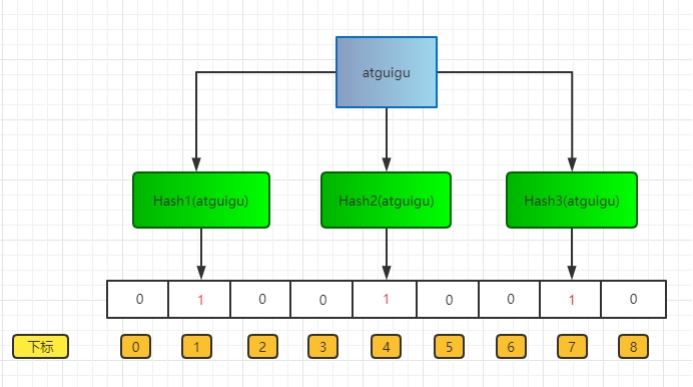
**存入过程 **
布隆过滤器上面说了,就是一个二进制数据的集合。当一个数据加入这个集合时,经历如下:
通过K个哈希函数计算该数据,返回K个计算出的hash值
这些K个hash值映射到对应的K个二进制的数组下标
将K个下标对应的二进制数据改成1。
如图所示:
查询过程
布隆过滤器主要作用就是查询一个数据,在不在这个二进制的集合中,查询过程如下:
1、通过K个哈希函数计算该数据,对应计算出的K个hash值
2、通过hash值找到对应的二进制的数组下标
3、判断:如果存在一处位置的二进制数据是0,那么该数据不存在。如果都是1,该数据可能存在集合中。
3.1.3 布隆过滤器的优缺点
优点
- 由于存储的是二进制数据,所以占用的空间很小
- 它的插入和查询速度是非常快的,时间复杂度是O(K),空间复杂度:O (M)。
- K: 是哈希函数的个数
- M: 是二进制位的个数
- 保密性很好,因为本身不存储任何原始数据,只有二进制数据
缺点
添加数据是通过计算数据的hash值,那么很有可能存在这种情况:两个不同的数据计算得到相同的hash值。

例如图中的“张三”和“张三丰”,假如最终算出hash值相同,那么他们会将同一个下标的二进制数据改为1。
这个时候,你就不知道下标为1的二进制,到底是代表“张三”还是“张三丰”。
一、存在误判
假如上面的图没有存 "张三",只存了 "张三丰",那么用"张三"来查询的时候,会判断"张三"存在集合中。
因为“张三”和“张三丰”的hash值是相同的,通过相同的hash值,找到的二进制数据也是一样的,都是1。
误判率:
受三个因素影响: 二进制位的个数m, 哈希函数的个数k, 数据规模n (添加到布隆过滤器中的函数)
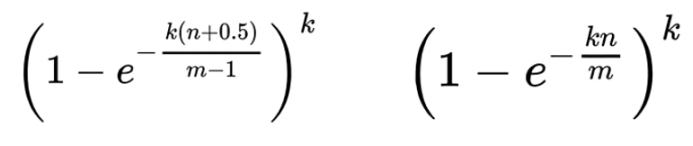
已知误判率p, 数据规模n, 求二进制的个数m,哈希函数的个数k {m,k 程序会自动计算 ,你只需要告诉我数据规模,误判率就可以了}

ln: 自然对数是以常数e为底数的对数,记作lnN(N>0)。在物理学,生物学等自然科学中有重要的意义,一般表示方法为lnx。数学中也常见以logx表示自然对数。
二、删除困难
还是用上面的举例,因为“张三”和“张三丰”的hash值相同,对应的数组下标也是一样的。
如果你想去删除“张三”,将下标为1里的二进制数据,由1改成了0。
那么你是不是连“张三丰”都一起删了呀。
3.2 初始化布隆过滤器
在service-album 模块的启动类中添加
package com.atguigu.tingshu;

import com.atguigu.tingshu.common.constant.RedisConstant;
import jakarta.annotation.PostConstruct;
import lombok.extern.slf4j.Slf4j;
import org.redisson.api.RBloomFilter;
import org.redisson.api.RedissonClient;
import org.springframework.beans.factory.annotation.Autowired;
import org.springframework.boot.CommandLineRunner;
import org.springframework.boot.SpringApplication;
import org.springframework.boot.autoconfigure.SpringBootApplication;
import org.springframework.cloud.client.discovery.EnableDiscoveryClient;
import org.springframework.cloud.openfeign.EnableFeignClients;
import org.springframework.scheduling.annotation.EnableScheduling;

@Slf4j
@SpringBootApplication
@EnableDiscoveryClient
@EnableFeignClients
@EnableScheduling //开启定时任务
public class ServiceAlbumApplication implements CommandLineRunner {

    public static void main(String[] args) {
        SpringApplication.run(ServiceAlbumApplication.class, args);
    }

    @Autowired
    private RedissonClient redissonClient;

    @PostConstruct
    public void initBloomFilter() {
        log.info("模拟初始化布隆过滤器开始...");
    }

    /**
     * springboot启动后自动执行一次该方法
     * 项目启动后自动初始化布隆过滤器
     */
    @Override
    public void run(String... args) throws Exception {
        //1.创建/获取布隆过滤器对象
        RBloomFilter<Long> bloomFilter = redissonClient.getBloomFilter(RedisConstant.ALBUM_BLOOM_FILTER);
        //2.判断过滤过滤器是否存在
        boolean exists = bloomFilter.isExists();
        log.info("布隆过滤器是否存在:{}", exists);
        if (!exists) {
            boolean flag = bloomFilter.tryInit(10000L, 0.03);
            log.info("初始化布隆过滤器,完成结果:{}", flag);
        }
    }
}
上架专辑的时候,添加将数据添加到布隆过滤器中
service-search模块中SearchServiceImpl上架专辑方法upperAlbum
@Autowired
private RedissonClient redissonClient;

/**
     * 构建专辑索引库文档对象,新增专辑到索引库
     *
     * @param albumId
     */
@Override
public void upperAlbum(Long albumId) {
    //....省略代码
    //9.将专辑ID存入布隆过滤器
    RBloomFilter<Long> bloomFilter = redissonClient.getBloomFilter(RedisConstant.ALBUM_BLOOM_FILTER);
    if(bloomFilter.isExists()){
        bloomFilter.add(albumId);
    }
}
查看专辑的时候判断布隆过滤器中是否存在
service-search模块中ItemServiceImpl汇总专辑方法getItemInfo()
@Autowired
private RedissonClient redissonClient;

/**
 * 汇总专辑详情相关信息
 *
 * @param albumId
 * @return
 */
@Override
public Map<String, Object> getAlbumItem(Long albumId) {
    //0.采用布隆过滤器解决缓存穿透问题
    RBloomFilter<Long> bloomFilter = redissonClient.getBloomFilter(RedisConstant.ALBUM_BLOOM_FILTER);
    boolean contains = bloomFilter.contains(albumId);
    if(!contains){
        throw new GuiguException(404, "专辑不存在");
    }
    //.....省略代码
}
3.3 布隆过滤器扩容
采用定时任务机制进行布隆过滤器扩容
package com.atguigu.tingshu.album.task;

import com.atguigu.tingshu.album.service.AlbumInfoService;
import com.atguigu.tingshu.common.constant.RedisConstant;
import com.atguigu.tingshu.common.constant.SystemConstant;
import com.atguigu.tingshu.model.album.AlbumInfo;
import com.baomidou.mybatisplus.core.conditions.query.LambdaQueryWrapper;
import lombok.extern.slf4j.Slf4j;
import org.redisson.api.RBloomFilter;
import org.redisson.api.RedissonClient;
import org.springframework.beans.factory.annotation.Autowired;
import org.springframework.scheduling.annotation.Scheduled;
import org.springframework.stereotype.Component;

import java.util.List;

/**
 * @author: atguigu
 * @create: 2025-06-11 10:19
 */
@Slf4j
@Component
public class RebuildBloomFilterTask {


    @Autowired
    private RedissonClient redissonClient;

    @Autowired
    private AlbumInfoService albumInfoService;

    /**
     * 公告:每月1号凌晨2~3点项目维护,避免数据不一致
     * 每月1号2点:重建布隆过滤器
     */
    @Scheduled(cron = "0 0 2 1 * ?")
    //@Scheduled(cron = "0/5 * * * * ?")
    public void rebuildBloomFilter() {
        //1.获取现有布隆过滤器对象,得到配置信息:1.期望数据规模  2.误判率 3.现有元素数量(预估值)
        RBloomFilter<Long> oldBloomFilter = redissonClient.getBloomFilter(RedisConstant.ALBUM_BLOOM_FILTER);
        long expectedInsertions = oldBloomFilter.getExpectedInsertions();
        double falseProbability = oldBloomFilter.getFalseProbability();
        long count = oldBloomFilter.count();
        //2.判断是否满足扩容条件:现有元素数量大于等于期望数据规模
        if (count >= expectedInsertions) {
            log.info("满足扩容条件,开始扩容重建...");
            //2.1 先初始化新的布隆过滤器,原有期望数据规模*2
            RBloomFilter<Long> newBloomFilter = redissonClient.getBloomFilter(RedisConstant.ALBUM_BLOOM_FILTER + ":new");
            if (!newBloomFilter.isExists()) {
                newBloomFilter.tryInit(expectedInsertions * 2, falseProbability);
                //2.2 将数据中先有合法专辑ID加入到新的布隆过滤器中
                List<AlbumInfo> list = albumInfoService.list(
                        new LambdaQueryWrapper<AlbumInfo>()
                                .eq(AlbumInfo::getStatus, SystemConstant.ALBUM_STATUS_PASS)
                                .select(AlbumInfo::getId)
                );
                for (AlbumInfo albumInfo : list) {
                    newBloomFilter.add(albumInfo.getId());
                }
                //2.3 删除旧的布隆过滤器:布隆过滤器配置及位图
                oldBloomFilter.delete();
                //2.4 重命名布隆过滤器,改为原来名称
                newBloomFilter.rename(RedisConstant.ALBUM_BLOOM_FILTER);
            }
        } else {
            log.info("不满足扩容条件,开始重建...");
            //3.不满足扩容条件,做基本重建:  1.初始化布隆过滤器 2.将数据中先有合法专辑ID加入到布隆过滤器中 3.重命名布隆过滤器,改为原来名称 4.删除旧的布隆过滤器
            //3.1 先初始化新的布隆过滤器
            RBloomFilter<Long> newBloomFilter = redissonClient.getBloomFilter(RedisConstant.ALBUM_BLOOM_FILTER + ":new");
            newBloomFilter.tryInit(expectedInsertions, falseProbability);
            //3.2 将数据中先有合法专辑ID加入到新的布隆过滤器中
            List<AlbumInfo> list = albumInfoService.list(
                    new LambdaQueryWrapper<AlbumInfo>()
                            .eq(AlbumInfo::getStatus, SystemConstant.ALBUM_STATUS_PASS)
                            .select(AlbumInfo::getId)
            );
            for (AlbumInfo albumInfo : list) {
                newBloomFilter.add(albumInfo.getId());
            }
            //3.3 删除旧的布隆过滤器:布隆过滤器配置及位图
            oldBloomFilter.delete();
            //3.4 重命名布隆过滤器,改为原来名称
            newBloomFilter.rename(RedisConstant.ALBUM_BLOOM_FILTER);
            log.info("布隆过滤器重建完成...");
        }
    }
}
4、数据一致性方案
4.1 缓存的更新方案(传统)
先更新DB还是先更新缓存?是更新缓存还是删除缓存?在常规情况下,怎么操作都可以,但一旦存在高并发场景,就需要采用合适的方案。
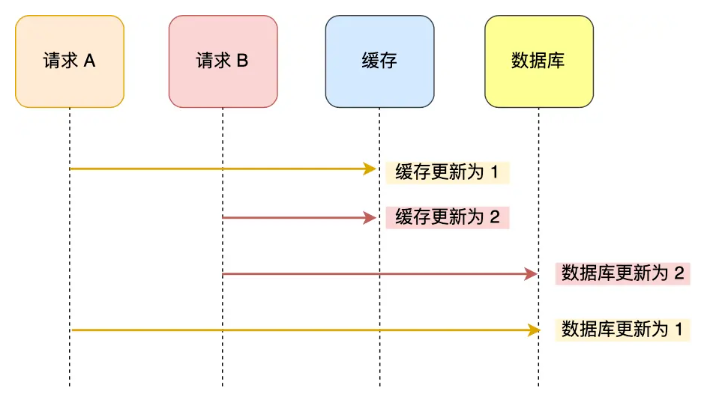
1、先更新数据库再更新缓存(双写策略1)
线程A:更新数据库(第1s)——> 更新缓存(第10s)
线程B:更新数据库 (第3s)——> 更新缓存(第5s)
并发场景下,这样的情况是很容易出现的,每个线程的操作先后顺序不同,这样就导致请求B的缓存值被请求A给覆盖了,数据库中是线程B的新值,缓存中是线程A的旧值,并且会一直这么脏下去直到缓存失效(设置了过期时间)。

2、先更新缓存再更新数据库(双写策略2)
线程A:更新缓存(第1s)——> 更新数据库(第10s)
线程B: 更新缓存(第3s)——> 更新数据库(第5s)
和前面一种情况相反,缓存中是线程B的新值,而数据库中是线程A的旧值。
前两种方式之所以会在并发场景下出现异常,本质上是因为更新缓存和更新数据库是两个操作,我们没有办法控制并发场景下两个操作之间先后顺序,也就是先开始操作的线程先完成自己的工作。
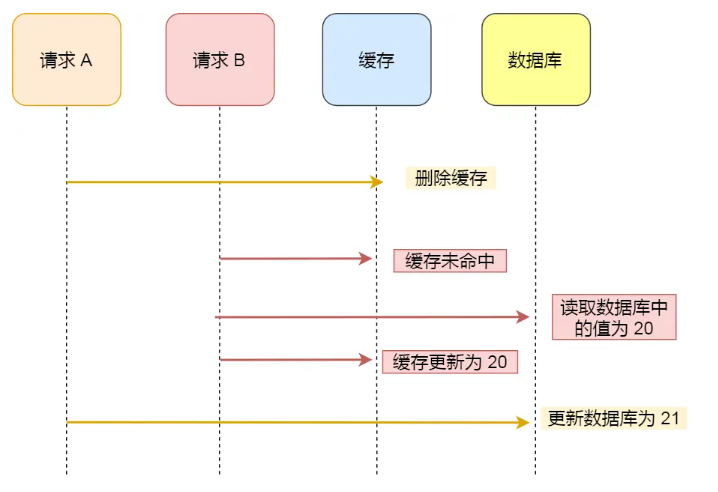
3、先删除缓存再更新数据库
通过这种方式,我们很惊喜地发现,前面困扰我们的并发场景的问题确实被解决了!两个线程都只修改数据库,不管谁先,数据库以之后修改的线程为准。
但这个时候,我们来思考另一个场景:两个并发操作,一个是更新操作,另一个是查询操作,更新操作删除缓存后,查询操作没有命中缓存,先把老数据读出来后放到缓存中,然后更新操作更新了数据库。于是,在缓存中的数据还是老的数据,导致缓存中的数据是脏的。很显然,这种状况也不是我们想要的。
4.2 延时双删方案
修改数据业务逻辑
1.删除缓存
2.更新数据库
3.睡眠一段时间(500ms)
4.再次删除缓存
加了个睡眠时间,主要是为了确保请求 A (更新)在睡眠的时候,请求 B (查询)能够在这这一段时间完成「从数据库读取数据,再把缺失的缓存写入缓存」的操作,然后请求 B 睡眠完,再删除缓存。
所以,请求 B 的睡眠时间就需要大于请求A「从数据库读取数据 + 写入缓存」的时间。
但是具体睡眠多久其实是个玄学,很难评估出来,所以这个方案也只是尽可能保证一致性而已,极端情况下,依然也会出现缓存不一致的现象。因此,还是不太建议这种方案。
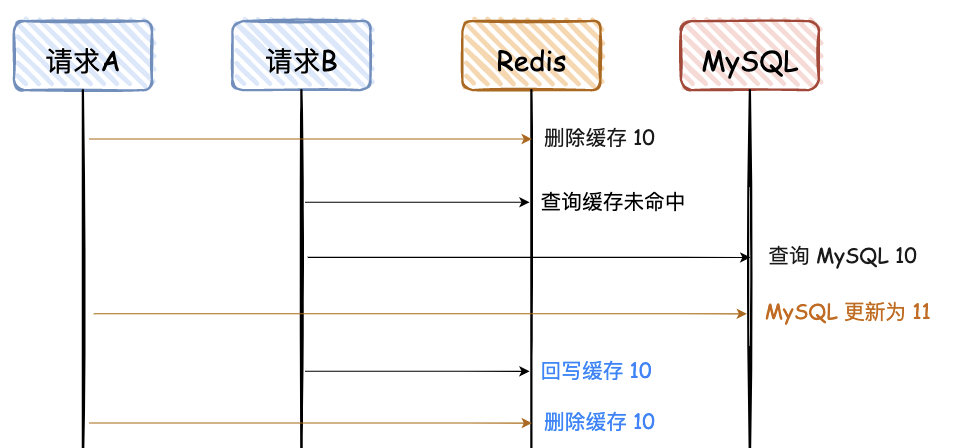
对于蓝色的文字,“删除缓存 10”必须在“回写缓存10”后面,那如何才能保证一定是在后面呢?让请求 A 的最后一次删除,等待 500ms。
4.3 分布式读写锁
- 读读允许并发
- 读写不允许并发
- 写读不允许并发
- 写写不允许并发
依赖“锁”的机制,避免出现并发读写。弊端:性能低
读数据方法(查询操作)
@Autowired
private RedissonClient redissonClient;


/**
 * 读数据方法
 *
 * @param id
 * @return
 */
@Override
public Long read(Long id) {
    //1.创建读写锁对象 锁名称前缀:数据标识
    RReadWriteLock readWriteLock = redissonClient.getReadWriteLock("myLock:" + id);
    RLock lock = readWriteLock.readLock();

    //2.获取读锁成功 执行读操作  读锁持有期间,不允许并发发写,允许并发读
    try {
        lock.lock(5, TimeUnit.SECONDS);
        log.info(Thread.currentThread().getName() + "执行读数据操作");
        return id;
    } finally {
        //3.释放读锁
        //lock.unlock();
    }
}
修改数据方法(修改操作)
/**
 * 写数据方法
 *
 * @param id
 */
@Override
public void write(Long id) {
    //1.创建读写锁对象 锁名称前缀:数据标识
    RReadWriteLock readWriteLock = redissonClient.getReadWriteLock("myLock:" + id);
    //2.获取写锁成功 执行写操作  写锁持有期间,不允许并发读,并发写
    RLock lock = readWriteLock.writeLock();
    lock.lock(5, TimeUnit.SECONDS);
    try {
        log.info(Thread.currentThread().getName() + "执行写入操作");
    } finally {
        //3.释放写锁
        //lock.unlock();
    }
}
4.4 Binlog方案
4.4.1 Canal服务端
「先更新数据库,再删缓存」的策略的第一步是更新数据库,那么更新数据库成功,就会产生一条变更日志,记录在 binlog 里。
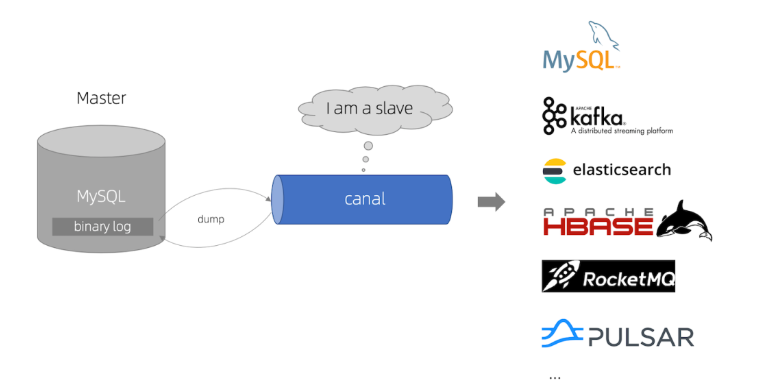
于是我们就可以通过订阅 binlog 日志,拿到具体要操作的数据,然后再执行缓存删除,阿里巴巴开源的 Canal 中间件就是基于这个实现的。
Canal 模拟 MySQL 主从复制的交互协议,把自己伪装成一个 MySQL 的从节点,向 MySQL 主节点发送 dump 请求,MySQL 收到请求后,就会开始推送 Binlog 给 Canal,Canal 解析 Binlog 字节流之后,转换为便于读取的结构化数据,供下游程序订阅使用。
下图是 Canal 的工作原理:
所以,如果要想保证「先更新数据库,再删缓存」策略第二个操作能执行成功,我们可以使用「消息队列来重试缓存的删除」,或者「订阅 MySQL binlog 再操作缓存」,这两种方法有一个共同的特点,都是采用异步操作缓存。
验证MySQL是否开启BinLog确保Value为 ON(已完成)
show variables like '%log_bin%';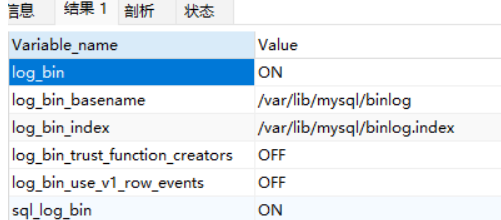
在MySQL新增用户用于监听Binlog日志,在Canal容器中要使用该用户(已完成)
#创建用户
CREATE USER canal IDENTIFIED BY '123456';
#给用户授权-所有库所有表主从同步权限
GRANT SELECT, REPLICATION SLAVE, REPLICATION CLIENT ON *.* TO 'canal'@'%';

#如果是MySQL8.X以上需要对加密方式进行设置
ALTER USER 'canal'@'%' IDENTIFIED WITH mysql_native_password BY '123456';
#刷新生效
FLUSH PRIVILEGES;
查询MySQL主节点状态;完成重置
SHOW MASTER STATUS;
reset master;

采用Docker方式创建Canal服务端。以下为创建Canal容器命令,要修改要监听主MySQL数据库IP跟端口用户名以及密码确保正确(不需要执行)
-e canal.instance.filter.regex=.\.. 代表监控所有数据库表变更的日志
   docker run -p 11111:11111 --name canal \
   -e canal.destinations=tingshuTopic \
   -e canal.instance.master.address=192.168.200.6:3306  \
   -e canal.instance.dbUsername=canal  \
   -e canal.instance.dbPassword=123456  \
   -e canal.instance.connectionCharset=UTF-8 \
   -e canal.instance.tsdb.enable=true \
   -e canal.instance.gtidon=false  \
   -d canal/canal-server:v1.1.8
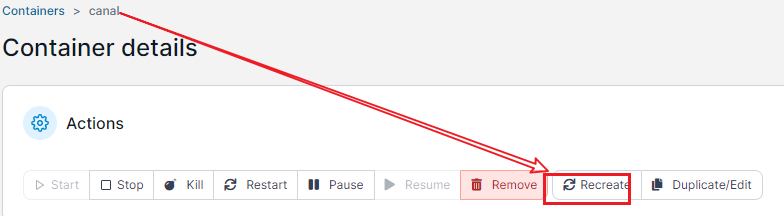
- 删除容器,重新创建canal容器,促使canal重新跟MySQL建立连接,从MySQL最新BinLog偏移量开始读取数据
Canal日志在容器
/home/admin/canal-server/logs/tingshuTopic 日志路径

4.4.2 Canal客户端
在
service父工程,下创建独立新模块service-cdc在java项目中引入依赖<?xml version="1.0" encoding="UTF-8"?> <project xmlns="http://maven.apache.org/POM/4.0.0" xmlns:xsi="http://www.w3.org/2001/XMLSchema-instance" xsi:schemaLocation="http://maven.apache.org/POM/4.0.0 http://maven.apache.org/xsd/maven-4.0.0.xsd"> <parent> <artifactId>service</artifactId> <groupId>com.atguigu.tingshu</groupId> <version>1.0</version> </parent> <modelVersion>4.0.0</modelVersion> <artifactId>service-cdc</artifactId> <properties> <maven.compiler.source>17</maven.compiler.source> <maven.compiler.target>17</maven.compiler.target> <project.build.sourceEncoding>UTF-8</project.build.sourceEncoding> </properties> <dependencies> <dependency> <groupId>io.github.xizixuejie</groupId> <artifactId>canal-spring-boot-starter</artifactId> <version>0.0.17</version> </dependency> </dependencies> </project>提供启动类
package com.atguigu.tingshu;

import io.xzxj.canal.spring.annotation.EnableCanalListener;
import org.springframework.boot.SpringApplication;
import org.springframework.boot.autoconfigure.SpringBootApplication;
import org.springframework.boot.autoconfigure.jdbc.DataSourceAutoConfiguration;

/**
* @author: atguigu
* @create: 2025-03-21 15:46
*/
@EnableCanalListener
@SpringBootApplication(exclude = DataSourceAutoConfiguration.class)
public class CDCApplicaiton {

   public static void main(String[] args) {
       SpringApplication.run(CDCApplicaiton.class, args);
   }
}
在Nacos创建配置文件
service-canal-dev.yaml内容如下:
server:
 port: 8601
canal:
 server: 192.168.200.6:11111
 destination: tingshuTopic
项目本地创建
bootstrap.properties配置文件spring.application.name=service-canal spring.profiles.active=dev spring.main.allow-bean-definiton-overriding=true spring.cloud.nacos.discovery.server-addr=192.168.200.6:8848 spring.cloud.nacos.config.server-addr=192.168.200.6:8848 spring.cloud.nacos.config.prefix=${spring.application.name} spring.cloud.nacos.config.file-extension=yaml spring.cloud.nacos.config.shared-configs[0].data-id=common.yaml监听到变更业务处理类-用户信息
package com.atguigu.tingshu.listener;

import com.atguigu.tingshu.model.user.UserInfo;
import io.xzxj.canal.core.annotation.CanalListener;
import io.xzxj.canal.core.listener.EntryListener;
import lombok.extern.slf4j.Slf4j;
import org.springframework.beans.factory.annotation.Autowired;
import org.springframework.data.redis.core.RedisTemplate;

import java.util.Set;

/**
* @author: atguigu
* @create: 2025-03-21 15:47
*/
@Slf4j
@CanalListener(destination = "tingshuTopic", schemaName = "tingshu_user", tableName = "user_info")
public class UserListener implements EntryListener<UserInfo> {

   @Autowired
   private RedisTemplate redisTemplate;

   /**
    * 监听用户表更新回调方法
    * @param before
    * @param after
    * @param fields
    */
   @Override
   public void update(UserInfo before, UserInfo after, Set<String> fields) {
       log.info("[cdc]监听到变更数据");
       String redisKey = "user:userinfo:"+after.getId();
       redisTemplate.delete(redisKey);
   }
}
监听到变更业务处理类-专辑信息
package com.atguigu.tingshu.listener;

import com.atguigu.tingshu.model.album.AlbumInfo;
import io.xzxj.canal.core.annotation.CanalListener;
import io.xzxj.canal.core.listener.EntryListener;
import lombok.extern.slf4j.Slf4j;
import org.springframework.beans.factory.annotation.Autowired;
import org.springframework.data.redis.core.RedisTemplate;

import java.util.Set;

/**
* @author: atguigu
* @create: 2025-03-22 08:46
*/
@Slf4j
@CanalListener(destination = "tingshuTopic", schemaName = "tingshu_album", tableName = "album_info")
public class AlbumListener implements EntryListener<AlbumInfo> {

   @Autowired
   private RedisTemplate redisTemplate;

   /**
    * 监听到转机信息表更新
    * @param before 变更前数据
    * @param after 变更后的数据
    * @param fields 变更字段
    */
   @Override
   public void update(AlbumInfo before, AlbumInfo after, Set<String> fields) {
       log.info("[cdc]监听到变更数据,变更前:{},变更后:{}", before, after);
       Long id = after.getId();
       String redisKey = "album:info:"+id;
       redisTemplate.delete(redisKey);
   }
}
tips:如果启动canal客户端长时间未监听到变更数据,做以下操作
重置MySQL binglog
#重置MySQL主节点Binglog
reset master;

SHOW MASTER STATUS;
重新创建canal容器